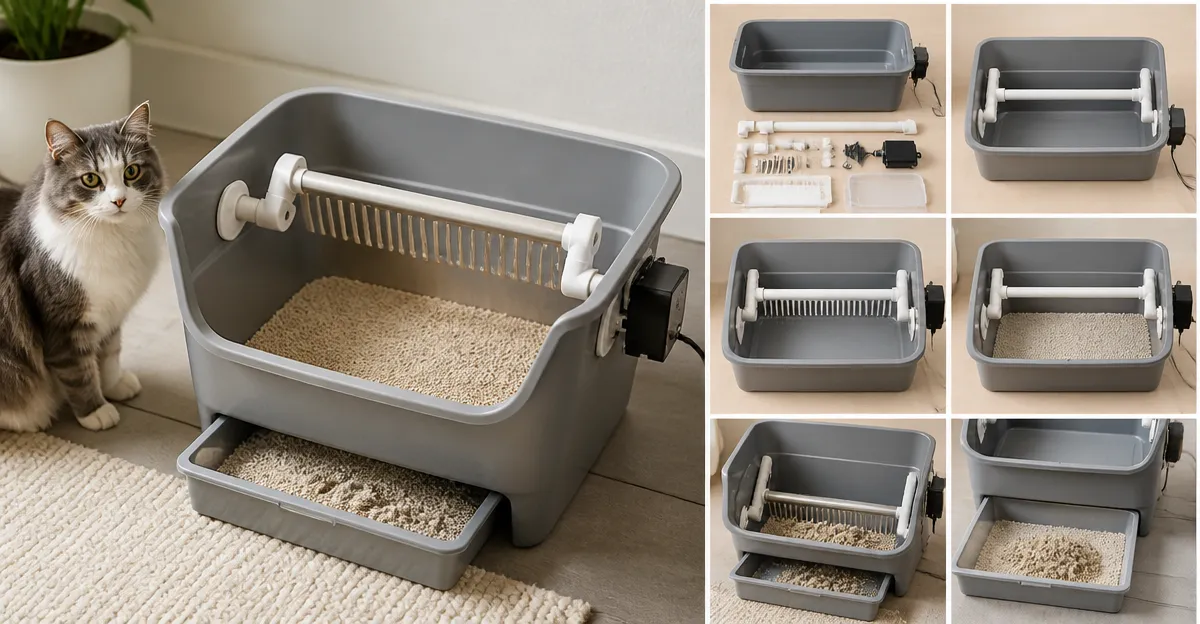
DIY Automatic Litter Box Conversion: Step‑by‑Step How‑to Build a Self‑Cleaning Cat Litter Box
Cat owners often spend hours scooping, deodorizing, and maintaining litter boxes. This guide shows how to transform a regular litter box into an automatic system, saving time and reducing odor. By following each step, one can create a reliable, quiet, and safe solution that rivals commercial models. The result is a cleaner home environment and more quality time with one’s feline companions.
What You’ll Need
- Standard open‑top litter box (plastic or metal)
- Micro‑controller or Arduino kit for motor control
- 12 V DC motor with gear reduction
- Infrared safety sensors (4 pairs recommended)
- Waste container (10 L capacity works well)
- Power supply and wiring accessories
- Optional: Mimfam Self‑Cleaning Litter Box for reference and spare parts
- Optional: Cumrige Automatic Litter Box for advanced sensor integration
Step 1: Choose a Base Litter Box
The foundation of any conversion is a sturdy, open‑top box that allows easy access for cats and for the cleaning mechanism. A box with dimensions around 16" x 15" provides sufficient space for most medium‑sized cats. One should verify that the material can withstand occasional moisture and the weight of a motor assembly. If you already own a Mimfam Self‑Cleaning Litter Box, you can reuse its top entry design as a template.
Step 2: Install the Motor and Gear System
Select a 12 V DC motor with a gear ratio that can rotate the litter tray slowly enough to avoid scattering litter. Mount the motor on the side of the box using metal brackets, ensuring the shaft aligns with a perforated drum that will hold the litter. Connect the motor to a power supply through a relay that can be triggered by the controller. The Cumrige Automatic Litter Box utilizes a similar motor‑drum arrangement, offering a proven design for reliable operation.
Step 3: Add Infrared Safety Sensors
Safety sensors prevent the cleaning cycle from activating while a cat is inside the box. Install four pairs of infrared sensors around the entrance, mirroring the configuration of the Mimfam model, which uses four pairs of infrared and three hall sensors for precise detection. Wire each sensor to the micro‑controller so that any interruption halts motor power immediately. This redundancy ensures that the device stops within milliseconds, protecting the cat from accidental pinching.
Step 4: Build the Waste Collection Chamber
A 10 L waste container is ideal for multi‑cat households, reducing the frequency of emptying. Fabricate a removable tray beneath the rotating drum, sealing it with a silicone gasket to prevent leaks. The tray should slide out easily for cleaning, similar to the waste bin in the Mimfam unit, which holds up to ten days of waste for a single cat. Adding a disposable liner, as supplied with the Mimfam box, simplifies odor control and disposal.
Step 5: Program the Controller
Upload a simple script to the micro‑controller that initiates a cleaning cycle five minutes after a cat exits the box. The program should read sensor data, pause the motor if any sensor is triggered, and resume once the area is clear. Include a low‑noise mode that limits motor speed to 32 dB, matching the whisper‑quiet performance of commercial models such as the Mimfam and Lohhuby boxes. Test the code repeatedly to ensure consistent timing and safety compliance.
Step 6: Power Management and Safety Features
Connect the system to a regulated 12 V power adapter, and incorporate a fuse to protect against short circuits. Add an emergency stop button on the front panel for manual shutdown during maintenance. The anti‑pinch technology found in the Lohhuby Smart Litter Box can be replicated by using a touch‑sensitive pedal that cuts power when pressed.
Step 7: Test the Complete Assembly
Before allowing cats to use the system, run several dry cycles to verify smooth rotation, sensor response, and waste collection. Observe the noise level and ensure it remains below 35 dB, which is comfortable for both pets and owners. Adjust the drum speed if litter is being scattered, a common issue noted in the otoging model. Once performance is satisfactory, introduce the box to the cats gradually, using treats to encourage exploration.
Tips & Pro Tips
- Use clumping bentonite litter; it solidifies quickly, reducing the chance of residue sticking to the drum.
- Place a step stool or ramp for senior cats, similar to the access step included with the PetPivot Open‑Top Litter Box, to aid comfortable entry.
- Schedule weekly deep cleaning of the sensor housings to prevent dust buildup, which can cause false readings.
- If the motor emits a humming sound, check the gear alignment; misalignment often leads to increased noise.
- Consider adding a small LED indicator to show when the cleaning cycle is active, providing visual feedback.
Troubleshooting
| Problem | Possible Cause | Solution |
|---|---|---|
| Motor does not start | Power supply disconnected or fuse blown | Verify connections, replace fuse, ensure adapter outputs 12 V. |
| Cleaning cycle stops mid‑rotation | Sensor falsely triggered | Clean sensor lenses, adjust sensitivity, or add a short debounce delay in code. |
| Excessive litter spillage | Drum speed too high | Reduce motor PWM duty cycle to lower rotation speed. |
| Odor persists | Waste container not sealed | Use disposable liners and add an activated‑carbon filter inside the bin. |
Conclusion
By following these steps, one can create a reliable, quiet, and safe automatic litter box that rivals premium commercial options. The conversion leverages affordable components while incorporating proven features such as infrared safety sensors, large waste capacity, and whisper‑quiet operation. Cats benefit from a consistent, clean environment, and owners save countless hours previously spent scooping. Embrace the DIY approach, customize the system to your household’s needs, and enjoy a cleaner home today.
Products Mentioned in This Guide
Frequently Asked Questions
What materials are needed to convert a regular litter box into an automatic self‑cleaning system?
You need a standard open‑top litter box, a micro‑controller (e.g., Arduino), a 12 V DC motor with gear reduction, infrared safety sensors, a waste container, a power supply, and wiring accessories.
How do the infrared sensors detect when the cat has finished using the box?
Pairs of infrared sensors create a beam that is broken when the cat steps in, and restored when it leaves, triggering the motor to start the cleaning cycle.
Can any 12 V DC motor be used, or are specific specifications required?
A motor with enough torque to lift and dump the litter and a gear reduction for slower, controlled movement is ideal; low‑rpm, high‑torque models work best.
How often should the waste container be emptied in a DIY automatic litter box?
Empty the 10 L waste container whenever it reaches about 80 % capacity, typically every 2–3 days for one cat, to prevent odor buildup.
Is a DIY automatic litter box safe for my cat compared to commercial models?
When properly wired, insulated, and equipped with safety sensors, a DIY system can be as safe as commercial units, but always supervise initial use to ensure reliability.